
Often people will come into our office asking for stretches that can help relieve low back pain. What I help provide is a path towards more than just pain relief. I truly believe that four keys to longevity and quality of life are found in
- strength,
- flexibility,
- symmetry,
- and balanced movement.
I have found that these 4 stretches produce great results for spinal health. Watch the video, read the descriptions, and try them for yourself! See if your back pain decreases as you become more flexible.
NOTE: Always come out of your stretches slowly to avoid the compensatory muscle or joint pain that can come from being in a deep, prolonged stretch.
Low Back Pain Relief Stretches Demonstration
This video was originally shown via Facebook Live. Be sure to like us on Facebook so you don’t miss our next live video tips!
QL Stretch
One route for low back pain relief is to target the quadratus lumborum, or the QL muscle
Step 1: Start seated on the floor with both legs straight out in front of you.
Step 2: Bring the bottom of your left foot as high up on your inner right thigh as possible by flaring your leg out. Try to bring your left knee as close to the floor as possible.
Step 3: Next, reach your left hand as far down the outside of your right leg as you can, ultimately aiming to grab the outside of your right foot (this might take a while, so be patient). This hand is your anchor hand for the stretch, so it is important that you can grab a hold of the outside of the right leg.
Step 4: Lastly, rotate your left hip back behind you while you hold the outside of your right leg with your anchor hand. It may take a couple tries to get the feel of this stretch, but it is a great low back stretch for hard to reach muscles.
When you first start doing this stretch, you may feel it more in your left shoulder blade than in your low back. Don’t worry about this at all. As you increase your flexibility, you will be able to reach lower down on the outside of your right leg and the feeling of stretch will progress down from your left shoulder blade into your low back.
To stretch the right lower back, bend your right leg, reach your right hand to the outside of your left leg/calf, then rotate your right hip back behind you.
I usually recommend holding this stretch for longer than the typical 20-30 seconds. Aim for 2-3 minutes and you should get great results and lower back pain over a couple weeks’ time.
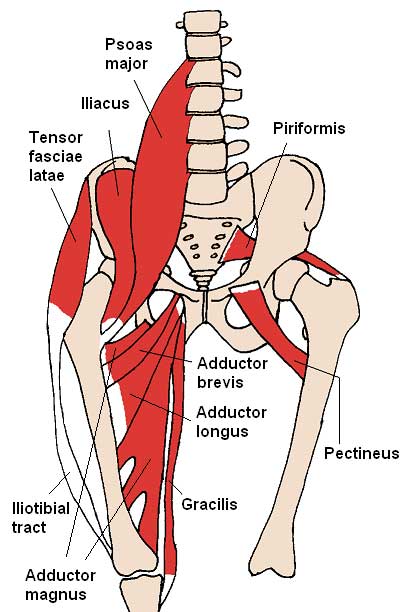
Piriformis Stretch
Sometimes the piriformis stretch can be helpful for alleviating low back pain.
This stretch is one of the most important and most neglected stretches for hip stability and flexibility. To perform this stretch, sit on the edge of a bed. Let’s start with the left side.
Step 1: Rotate your hips 90 degrees to the left, bringing your left leg up on the bed bent at the knee. Make sure the knee of your right leg stays even with or behind your right hip.
Step 2: Now, keeping your left thigh perpendicular to your torso, bend over your left leg. You should feel a stretch in the area behind your left hip. This stretch has a “volume control” to it. The more you straighten out your left leg, the more intense the stretch. If it feels too intense, just bend your left knee until the stretch is tolerable.
To stretch the right side, just reverse the above.
This is another stretch I believe needs a longer time to be as effective as it can be for you. I recommend staying in this stretch for 2-3 minutes if possible.
Hip Flexor Stretch/Psoas Stretch/Lunge Stretch
 This stretch does more to keep an upright posture as we age than any other I can find. That posture can do wonders to alleviate some of that irritating low back pain.
The hip flexor muscles attach to the sides of the lumbar spine and connect to the hip joints. Shortening of these muscles over time from prolonged sitting, hip or low back issues, etc., creates the telltale hunched over posture we often associate with aging.
To perform this stretch, start in a kneeling position on the floor. You may want to put a folded towel under your knees or use a pad of some type if you don’t have carpeted floors as this stretch can be uncomfortable for the knees otherwise.
Let’s start with the left side.
Step 1: From your kneeling position, bring your right leg up in front of you so your right foot is flat on the floor and your right knee is bent at about 90 degrees.
Step 2: Now slide your right foot forward as far out in front of you as you can while still keeping the bottom of your right foot on the floor. Sink your hips toward the ground, trying to relax into this position as much as you can. It is very important that you keep your torso as upright as possible and don’t give in to the urge to bend forward at the waist.
Step 3: Now, reach up as high as you can with your left hand and bend to the right. Hold this stretch for 20-30 seconds. Repeat for the other side.
Modified Jefferson Curl (J-Curl) Stretch
Think deadlift but with your chin tucked and it will help you with this stretch. Start standing on the edge of a step or step aerobics block with just the tips of your toes over the edge of the step.
[x_alert type=”danger”]NOTE: For those of you with balance issues, be careful doing this stretch. Have something to grab if you lose your balance during the movement.[/x_alert]
Hold hand weights for this stretch (5-15 pounds will do).
Step 1: Start the stretch by slowly tucking your chin to your chest.
Step 2: Keeping your chin tucked (critical component – it doesn’t work unless you do this for the whole stretch), slowly bend forward trying to focus on bending one vertebra at a time. Try not to let your hips move back during the stretch to the extent you can. Fold as far forward as you can.
You may feel an uncomfortable stretch in your back, hamstrings, and often the sides of your thighs as you bend forward. Stick with it. Don’t worry about how far you bend on the first repetition or two. You will notice that you are able to stretch farther each time you bend. The goal is to continue doing the stretch until the weight is actually below your feet.
At the end of each forward bend, reverse the motion and “uncurl” your spine back to the start position. Aim for 5-10 repetitions.
Wrap Up
Some of the stretches described above take time to master, but will help you to either regain or maintain more balanced, symmetric, flexible motion in your spine and pelvis. These stretches can be a great benefit if you suffer from low back pain.
If you find that performing these stretches gives you increased pain (more than just “cranky” muscles from stretching), sharp pain, or other symptoms that you wouldn’t normally associate with stretching, or if you get discomfort that seems to be increasing over time, it would likely benefit you to be evaluated by an expert in the biomechanics of the spine (chiropractor, physical therapist, etc.) to be sure there aren’t other underlying issues that need to be addressed.